Wednesday, 24 October 2012


How to Protect an Email Account from SPAM


Protect Email Account from SpamMost of us get SPAM every day. Some of us get more and some little. Even a newly created email account will begin to receive spam just after a few days of it’s creation. Many times we wonder where these spam come from and why? But this question remains unanswered within ourselves.
So, in this post I will try my best to give you every possible information about the spam and also the ways to keep your email account protected.

What is Spam?

Spam is the abuse of electronic messaging systems (including most broadcast media, digital delivery systems) to send unsolicited bulk messages indiscriminately. Most widely recognized form of spam is an email spam.

Where do these Spam come from?

These spam come only from spammers and never from a legitimate user or a company. These spammers send a single email to hundreds (some times thousands or millions) of email addresses at a time. They either send it manually or use spambots to automate the process of spamming.

Why do Spammers Spam?

The main goal of spammers is to send the spam (unsolicited bulk messages) to as many people as possible in order to make profit.
For example, John builds a small website to sell an ebook which gives information about weight loss. In order to make sales, he needs publicity for his website. Instead of spending money on advertising, John decides to create an email which contains information about his site along with it’s link and send this email to say 100 email addresses in his contact list. If 1 person out of hundred buy this book john gets $10. What if he sends this email to 1000s of email addresses? He gets $100. Imagine, if he sends this email to 1 Million email addresses he gets $100000!
Now I hope you understood the idea behind spamming. So, in order to make money, spammers send their advertising emails to as many people as possible without respecting the recipient’s privacy.

From where do Spammers get your email address?

On the Internet, there exists many websites who collect the email IDs of people and sell them to spammers in bulk. Most often, people sign up for monthly newsletters and take up surveys. This is the time where these scam sites get their email addresses. Also, many spammers collect email addresses by using spambots. These spambots collect email addresses from the Internet in order to build mailing lists. Such spambots are web crawlers that can gather email addresses from websites, newsgroups, forums, special-interest group (SIG) postings and chat-room conversations.
Spammers also use the trick of creating Hoax Emails for gathering a huge list of email IDs. For example, a spammer sends a hoax email which says “Forward this Message to Help Severely Burned Child”. This email claims that 11 cents will be donated to the child’s family every time the message is forwarded to another person. Most of the people believe this to be true and start forwarding this hoax email to all of the IDs in their contact list. In this way, the email spreads rapidly and eventually when it reaches the creator (spammer), the spammer gets a huge list of valid email addresses in the email header.
When you get these kind of hoax emails, you can see for yourself in the email header which contains a huge list of email addresses of all those people to whom the email is being forwarded to. This is one of the effective methods used by spammers to gather email addresses.

Is Spamming legal?

Spamming is completely illegal. Yet, it is really difficult to stop spammers from spamming as they keep moving from one hosting company to another after getting banned. This makes it practically impossible to catch spammers and prosecute them.

How to protect your email account from getting Spammed?

The following methods can be used to combat email spam:
  • Use spam filters for your email account. If you’re using email services like Gmail, Yahoo, Hotmail etc. then spam filters are used by defaut. Each spam filter has it’s algorithm to detect spam emails and will automatically move them to the SPAM folder. This keeps your inbox free from spam. However, some spam emails become successful to make their way into the inbox by successfully bypassing the filters.
  • Do not post your email address in public forums, user comments and chat-rooms. Give your email address only to trustworthy websites while signing up for newsletters.
  • While taking up online surveys or filling up feedback forms, it is better not to give your personal email address. Instead sing-up for a dummy email account and use this for surveys and feedback forms.
  • While posting your contact email address on your website, use this format: emailaddress [at] yoursite.com instead of emailaddress@yoursite.com. This protects your email address from being indexed by spambots.
  • Do not respond to hoax messages. When you receive a hoax email, avoid forwarding it to your friends. Examples of hoax messages can be found at www.hoax-slayer.com. If you really want to forward it to your friends, make sure that you use “Bcc” (blind carbon copy) option to send the email. This will hide all the email IDs to which the mail is forwarded to. For more information on this topic, you read my other post on benefits of using Bcc while sending an email.
I hope this helps. Pass your suggestions and feedback via comments
.

Use One Gmail Account to Send Emails from Multiple IDs


Send Emails from Multiple Addresses using One Gmail AccountIn this post, I am going to show you how to use your Gmail account to send and receive emails from multiple addresses. Most of us own more than one email account say for example, one from Gmail, one from Yahoo and one fromHotmail. If you are tired of logging into multiple accounts to check your inbox or send emails, I have a solution here.
Gmail has an option to integrate multiple email accounts (email addresses) into a single Gmail account. Once you integrate multiple email addresses into your Gmail account, you can use the same account to send and receive emails for different email addresses you have. Let’s take a simple example.
Suppose you have three email addresses (email accounts):
  1. john@gmail.com
  2. john@yahoo.com
  3. john@hotmail.com
You can integrate the emails john@yahoo.com and john@hotmail.com to john@gmail.com and operate all the three accounts from your single gmail account. Here is a step-by-step procedure to do this:
  1. Login to your gmail account.
  2. Click on Settings at the top right corner.
  3. Under Settings, click on the  Accounts tab.
  4. Now you’ll see the first option “Send mail as:“
  5. Under this option, click on Add another email address you own.
  6. Now a small new window will pop-up asking you to enter the details of your new email address.
  7. Here you can enter any name and any email address. The email address need not belong to gmail only. You can enter your yahoo, hotmail or any other valid email address.
  8. A Verification email will be sent to the address that you specify. Once you verify that you own the email address, it will be integrated to your Gmail account.
Now, when you compose a new email, you’ll see an option to select from multiple address to send the mail. Also you’ll receive the incoming mails for multiple addresses to a single mailbox. I hope this will benefit you.
Before you leave, I should also tell you one good advantage of this. According to Gmail privacy policy, they will not send the user’s IP address in the outgoing emails. That means, when you send an email from your Gmail account , the receiver will not be able to find out your IP address. But you do not have this advantage in Yahoo or other email providers.
Please share your opinions through comments. I hope this helps…
.

Access Your Facebook Account with 3 Passwords


Access Facebook with 3 PasswordsDid you know that you can login to your Facebook account using 3 different passwords? Seems interesting isn’t it? Yep! Unlike any other online account which has only one password to access, Facebook lets you log in using 3 different variants of your password.
Only a few Facebook users are aware of this fact, but for many others, this might seem a bit surprising. Facebook accepts the following forms of your password:

1. Your Original Password

Let me explain this to you with the following example. Assume that your default Facebook password that you created during the sign-up process is:
Facebook-Password-1

2. Password with the Case Toggled

In the above password the letters ‘F’ and ‘P’ are in uppercase and the remaining are in the lowercase. If youTOGGLE the case where all the UPPERCASE characters are converted into the lowercase and vice versa, your default password “myFacebookPass” would become:
Facebook-Password-2
Now if you log in using the above toggled password, your Facebook will accept it and welcomes you! This is the first variation of your default password which is accepted by Facebook.

3. Password with the First Letter Capitalized

If the first character of your password is in the lowercase, you may just change that first letter to UPPERCASE and Facebook will again accept it and let you in. As in case of the above example where your default password is “myFacebookPass”, if you just change the first letter to UPPERCASE, your password would be “MyFacebookPass” and this should work fine as well:
Facebook-Password-3
Please note that this option will work only for the Mobile uers!

Why 3 Passwords?

Now, you all know that Facebook can be accessed using 3 different passwords. But you may be curious to know the actual reason behind it.
Well, this is definitely not because Facebook has a bug or a serious vulnerability. In fact, this is just an option provided by Facebook itself to make the sign-in process easier for the users. Here’s how:
The most common reason for the authentic logins to be rejected is when the CAPS LOCK is ON. This is where the first variation comes in handy. That means, when the CAPS LOCK is ON the case gets reversed (toggled) for your password but Facebook will accept this as well.
In case of mobile users, it is a common for the first letter of the password to get capitalized which often leads to the login failure. So, in order to tackle this issue, Facebook will also accept the password where only the first letter is capitalized.
Thus if the CAPS LOCK is accidentally enabled, the toggled password feature would still let you log in to your account!

20 Awesome Google Chrome Browser Tips and Tricks


Probably most of you are already using Chrome as your primary browser. If not, switch to it immediately. Chrome is extremely fast when compared to any other browser.
These tips will help you to get most out of the Chrome browser.

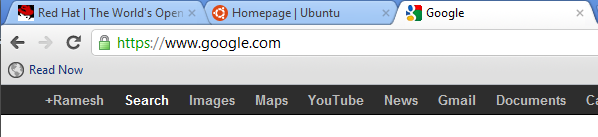
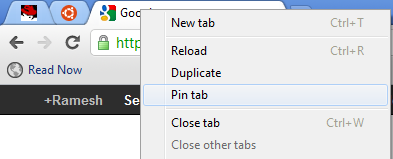
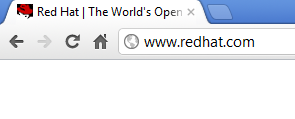
1. Pin Tab

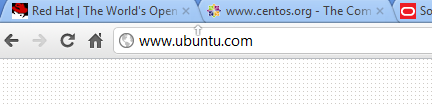
When you pin a tab, it minimizes the tab to display only the icon. When you have several tabs opened, this feature is very helpful, as the Tab title displays only the icon and takes only little real estate.
Before pinning:
After pinning 1st two tabs:

2. Display Home Button

By default, chrome doesn’t display the ‘Home’ button in the toolbar.
Click on the ‘Wrench Icon’ on the right-hand corner of the browser to get to the “Customize” option for Chrome browser -> Preferences (or Options) -> Select the check-box for “Show home button in toolbar”
This will now display the ‘Home’ button in front of the URL field. Click this button to go to your home page quickly.

3. Omnibox

The URL address bar (also called as Omnibox in Chrome) in the Chrome browser is not only to enter your URL. Just type the keyword you want to search and press enter, which will perform a google search.
You can also perform calculations or conversions directly in the Omnibox. Try typing any one of the following in the URL address bar and press enter to see the results yourself.
7 + 200
7 * 200
1 lb in kg
2 miles in km

4. incognito – Secret Mode

Incognito mode is for private browsing, where Chrome doesn’t record your browsing history, download hisotry. Any cookies that are stored during the incognito mode is deleted when you close the browser.
You can launch incognito by pressing Ctrl + Shift + N, (or) Settings -> New incognito Window, (or) right mouse-click on a link from a regular Chrome session, and select “open link in incognito window”.
One of the practical use for this mode (apart from private browsing) is to login to the same site using two accounts.
For example, if you have two gmail accounts, login using the first account in your regular Chrome browser, and login using the second account in your Incognito mode on your Chrome browser. This way, you can be logged in to two gmail accounts at the same time on Chrome browser.

5. Reopen Recently Closed tab

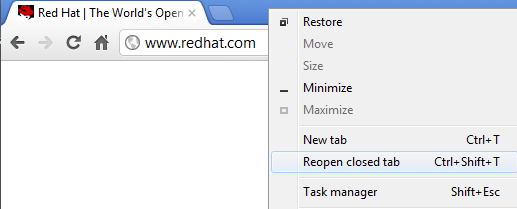
If you’ve closed a tab by mistake, you can open it by pressing Ctrl + Shift + T, (or) right mouse-click on the empty area in the title-bar -> and select “Reopen closed tab” as shown below.

6. Chrome:// commands

There are various about command that you can type in the address bar.
chrome://histograms
chrome://memory
chrome://cache
chrome://dns
etc.

7. Task Manager

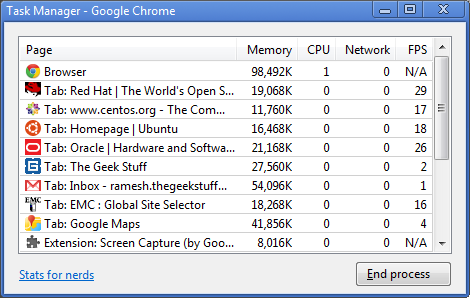
Task manager displays the memory and CPU usage of the Chrome browser, broken down by each and every Tab. If you have multiple Tabs open, and when your system is slow, you can use task manager to identify which Tab is causing the issue.
Right click on empty space in the title bar and select “Task manager”, (or) Press Shift + escape key to launch it as shown below.

8. Change Search Engine in the Omnibar

Type “amazon” in the address bar AND press “Tab”, which will change the address bar to “Search amazon.com:”, any keyword you type after this will be searched in the amazon.com and it will take you to amazon.com website.
You can also change the default search engine. Right click on the address bar -> and select “Edit search engine”. From here you can choose other search engines.

9. Open a link at a specific Tab Location

As you already know, when you right click on a link, and say “Open link in a new tab”, it opens it as a new tab (next to the current open tab).
However, if you want the link to be opened at a specific tab location, you can hold the link, drag it and drop it as a specific tab location. You’ll see a small arrow when you drag and drop the link. In the following example, I tried to drop the link at 2nd tab location.

10. Carry your Chrome Settings with You

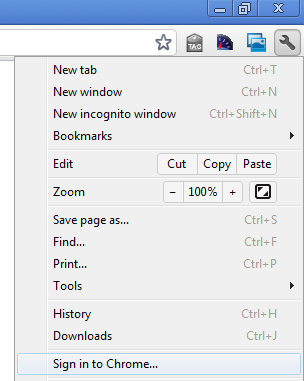
If you are using multiple computers (at home, at work, etc.), you don’t need to worry about trying to setup the Chrome browser in the same way on all the computers you use. Instead, setup your bookmarks, extensions, themes, settings, etc, on your Chrome browser on one computer, and select “Sign in to Chrome” from the settings menu as shown below.

This will ask you to enter your google username and password. This will save all your chrome settings on your google account. Next time when you sign-up from another machine, all your chrome settings will be visible on the new system. If you make any changes to your chrome settings on this new system, it will be available on your other computers too. Use this feature only on the systems which you trust and not on public computers.

11. Drag and Drop Downloaded file

Once a file is downloaded, you can just drag and drop the file (from the Chrome download window) to your Windows explore, or any other file browser that you are using on your system.

12. History

Press Ctrl-H, or go to Customize -> History, to launch the history window. From here you can search for a specific website from your history, delete all your history, or delete only selected items from your history.

13. Create a Shortcut of the Current Tab

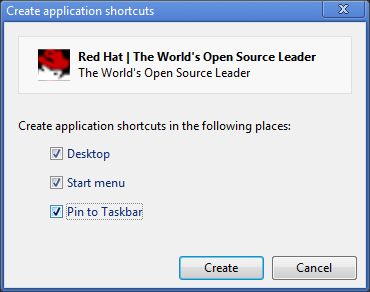
If you like to create a shortcut to the website that you are currently viewing, go to Customize -> Tools -> Create application shortcuts. This will ask you where you like to create the shortcut for this website, as shown below.

Once you create a application shortcut, next time when you click on it to open it, it will open this site in a Chrome browser without any tabs, url location bar, etc.

14. Navigate Between Tabs Quickly

  • Use Ctrl+Tab to navigate Tabs one by one
  • Press Ctrl-1 to go to 1st Tab
  • Press Ctrl-2 to go to 2nd Tab
  • ..
  • Press Ctrl-9 to switch to the last Tab

15. Resize TextArea

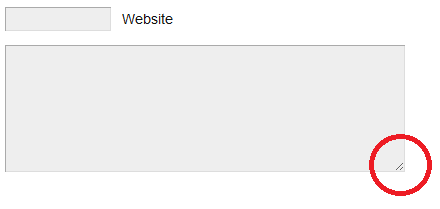
You can also resize a textarea that you see on any website. Please note that you can resize only the textarea and not a textbox. At the bottom right corner of the textarea, you’ll see two slanted lines, use your mouse, hold this, and drag it to resize the textarea on the screen.
You can try this yourself on the comment box (which is a textarea) located at the bottom of this page.

16. Detach a tab

If you have multiple Tabs opened, and like to detach a single tab as a separate Chrome instance, just drag the tab anywhere outside the browser, which will detach the tab and run it in a separate Chrome browser window.

17. Highlight a Text and Search

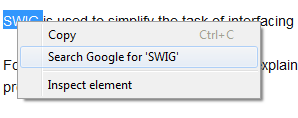
When you are browsing a website, if you come across some word that you are not familiar with and like to perform a google search on it, just double-click on the text to high-light it, right mouse-click, and select “Search google for”, which will open a new Tab and search for the selected text. This saves some time.

18. Autofill

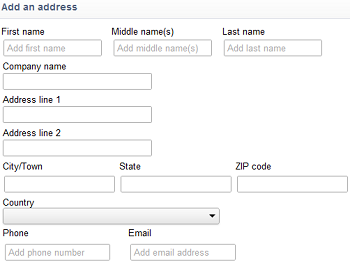
You can use the autofill option to enter one or more addresses that you can use to fill-up any web forms. You can also use this feature to store one or more credit card information that can be pre-populated on web forms. Don’t use this feature on a computer that you don’t trust.
Go to settings -> Options -> Personal Stuff -> Click on the check-box “Enable Autofill to fill out web forms in a single click” -> Click on Manager autofill settings -> Click on ‘Add new Address’ and enter the information.

19. Google Cloud Print

Go to Settings -> Options -> Under the Hood -> click on sign into “Google Cloud Print”.
Once you setup your printer using Google cloud print, you can print to it from anywhere. i.e You can print to it from your mobile, other PC at work, or any other system that is connected to the internet.

20. Google Chrome Browser Shortcuts

The following are some useful shortcuts:
  • Alt+F – Open the wrench menu (i.e chrome settings menu)
  • Ctrl+J – Go to downloads window
  • Ctrl+H – Go to history window
  • Ctrl+Tab – Navigate Tabs
  • Alt+Home – Go to home page
  • Ctrl+U – View source code of the current page
  • Ctrl+K – To search quickly in the address bar
  • Ctrl+L – Highlights the URL in the address bar (use this to copy/paste the URL quickly)
  • Ctrl+N – Open a new Chrome browser window
  • Ctrl+Shift+N – Open a new incognito window (for private browsing)
  • Ctrl+Shift+B – Toggle bookmark display
  • Ctrl+W – Close the current Tab
  • Alt+Left Arrow – Go to the previous page from your history
  • Alt+Right Arrow – Go to the next page from your history
  • Space bar – Scroll down the current web page

Disclaimer

All the Opinions and views expressed in this site are individual opinions.

Copyright, Licenses and Idea Submissions.
The entire contents of the Site are protected by international copyright and trademark laws. The owner of the copyrights and trademarks are http://wiki-trickz.blogspot.in/, its affiliates or other third party licensors. YOU MAY NOT MODIFY, COPY, REPRODUCE, REPUBLISH, UPLOAD, POST, TRANSMIT, OR DISTRIBUTE, IN ANY MANNER, THE MATERIAL ON THE SITE, INCLUDING TEXT, GRAPHICS, CODE AND/OR SOFTWARE.
     Some posts In This Page May Be Published In Other Sites or Blogs. Any Complaint or Requests To Remove It Will Be Entertained and Necessary Actions Will Be Taken. Send Complaint And Requests To gautham.haridas.8@gmail.com
Any pages or documents in this site may resemble some articles in other websites , it may be a coincidence , or if it is not a coincidence , owners of the respective site please excuse me for including the article , and the can contact me and ask for removing /changing  any article or page in the site. PLEASE DON’T GO FOR ANY LEGAL PROSECUTIONS. 

Email
Email address mentioned in the comment form will always be used for privacy and never be used for spamming or will be sold to anyone.

Comments
We love comments, but any comments which is abusive or in any way hurting anyone opinion will never be entertained. All Our comments are moderated to maintain the integrity of individuals. We keep all the rights to accept or reject the comments.


24 Great Facebook Tricks And Hacks


1. Hide Your Online Status From Selected Friends:

So you want to use Facebook chat but don’t want some people to see your online status? Simply open up the Facebook Chat and click on Friends List. Start creating a new list calledBlockList.

Once the list is created, add those friends to the list that you want to appear offline to. When the list is complete, hover your mouse to the little green icon adjacent to the list and click Go Offline. Bingo! You will now appear offline to everybody in the BlockList.

2. View a Friend’s Profile Without Messy Applications:

If you are like me, you often get annoyed by the dozens of silly applications that people have added to their profile. Here’s a Grease Monkey script that allows you to view any profile without all those applications. Remember: the Mozilla Firefox web browser is a prerequisite for running Greasemonkey.

3. Display Your Facebook Status On Your WordPress Blog:

Want to display your Facebook status updates on your WordPress blog? There is a plugin that does exactly that. StatusPress lets you display your status updates to a widget on your WordPress blog.

4. Access Facebook Chat Through Your Desktop:

No need to go to Facebook.com if all you want to do is use Facebook chat. You can do it right from your desktop using clients like social.im , Adium or ChitChat.


5. Update Facebook Status From Firefox:

If you are a firefox addict you don’t need to use any other software to update your Facebook status. Simply install the FireStatus add-on and update your status right from your browser. You can also use the Facebook Toolbar to completely manage Facebook from your Firefox browser.

6. Create A Photo Collage From Pictures Of Your Facebook Friends:

Easily create a photo collage from profile pictures of all your Facebook friends using a simple Facebook app called Photo Collage.

7. Add A New friend But Hide It From Your Status Update:

A great tutorial by Tim Watson walks you through the process of hiding specific actions from your status updates.

8. Schedule Facebook Messages To Be Send Later:

If you want to schedule your Facebook messages to be send sometime in the future, Sendible is a great tool to do that. You can also use Sendible to schedule your status updates.

9. How To Share Flickr Photos On Facebook:

My Flickr is a Facebook application that lets you display your Flickr photos and photo sets on Facebook so your friends can view and comment on them without leaving Facebook.

10. How To Download Facebook Photo Albums:

Ever felt the need to download complete photo albums from Facebook. You can easily do it with either a Windows desktop application named FotoBounce or a great Firefox add-on FacePad. 


11. Upload Photos On Facebook From Your Phone:

All the smart phones like iPhone and Blackberry make it simple to upload photos to your Facebook account but how would you do it if you have a regular phone? Here is a great tutorial to walk you through that.

12. Magic Circles On Facebook:

You might have heard about the Konami code that makes red blurry circles on your Facebook page. This might be one of the most popular Facebook hidden tricks. Here’s how to do it:
Press Up, Up, Down, Down, Left, Right, Left, Right, B, A, Enter key then press up & down & Magic circles will appear!
To stop them simply reload your page.


13. Use Your Facebook Like A Pirate:

Do you love talking like a pirate? You can set your Facebook to appear like a pirate page by going into Current Language Settings and setting it to English (Pirate).


14. How To Insert Cool Symbols In Your Status Updates:

Make your status updates interesting by inserting cool symbols. Simply copying them from this list and pasting in your status updates.


15. Automatically Poke Friends That Poke You:

Don’t have enough time to poke back friends who poke you on Facebook? Automate it with a Grease Monkey script called Facebook Autopoke.

16. Upload Photos From PicasaTo Facebook:

Upload photos to your Facebook account directly from Picasa using the Picasa app for Facebook. You can also upload the Picasa captions and resize your photos before uploading them to Facebook.

17. Search Facebook Like A Pro:

Not everybody knows how powerful Facebook search is. Similar to any large search engine,Facebook search has a lot of advanced options to help you search like a pro. For example if you are looking for a person named John Marsh and filter your results down to only people who are married, you can try name: John Marsh status:married. A complete list of search tips for Facebook can be found here.


18. How To Update Facebook Status From Gmail:

Facebook gadget for Gmail allows you to update your Facebook status right from your Gmail.


19. How To Access Gmail From Facebook:

If you seldom have to leave Facebook just to go check your Gmail inbox, check out Fmail. It is a great application that lets you check your Gmail from within your Facebook inbox.

20. See Facebook Twitter style:

If you love Twitter more than Facebook, you can view your Facebook just like you view your Twitter using this grease monkey script.

21. Import Facebook Friends To Twitter:

FB140 is a simple tool that lets you find all your Facebook friends that are using Twitter so you can easily follow them.

22. Access Facebook From Microsoft Outlook:

This is a great tip for people attending colleges or working in places that block Facebook, but allow you access to Microsoft Outlook. Simple install the FBlook plugin and access Facebook from Outlook.

23. Display Your Facebook Status Upside Down:

This is a cool and fun trick. To display upside down status updates, simply head over to FlipTextand type in your status. Then simply click on Flip Text and copy-paste the upside down text into your Facebook status box.


24. Update Facebook Status Using Twitter:

Wouldn’t you love to update your status on both Facebook and Twitter at the same time. Just install the Twitter application for Facebook. Once synced, your tweets including the #fb tag would automatically be posted as status updates on your Facebook.